Designing engaging exercises when students do not yet possess a lot of knowledge can be difficult. I show how I draw on students’ prior knowledge, along with basic introductory concepts, to design an elemental (but fun) port scan exercise in an introductory security testing module. While “capture the flag” is a security industry standard for exercises, it can require a lot of in-depth knowledge to properly implement and complete. Using basic computer science concepts such as ports and ASCII values, I designed a simplified capture the flag exercise where students can make use of deductive reasoning to complete the game.
Introduction
Hands-on practical experience is important for students to absorb theoretical knowledge. This is especially true when learning the art and science of computer security testing. However, designing exercises that adequately tests specific outcomes while staying interesting (or fun) can be difficult. Where this is particularly hard is during the beginning stages of a security module where not a lot of content has been covered and the students do not yet possess a lot of knowledge that can be applied.
The basic learning concept of experiential learning comes to play when designing activities for a module. Theory should be reinforced by practical experience in a setting that allows the student to not only better understand said theory, but blend it with knowledge and experiences they already possess.
The Basic Port Scanning Exercise
A course discussing fundamental ethical hacking procedures, at some point introduces the concept of “port scanning”. Port scanning, as part of information gathering, has the aim of locating live hosts on a network that could potentially contain vulnerabilities by detecting which ports are open on these hosts and which services they offer.
When discussing port scanning, the most common tool in the industry, nmap (Network Mapper), is also introduced. It is at this point where students will need to gain some practical experience of the theory of port scanning as well as the tools involved. The most common approach would be to have a set of hosts on a network and have the students perform a port scan on these hosts. They will then need to write a report detailing their scanning steps and which ports were detected to be open, closed, or filtered. However, I found that simple exercises such as these could often leave students bored and wanting.
For an introduction to security testing course, at the point of discussing port scanning, I decided to create an exercise that will be a bit more exciting by having a simple introductory Capture the Flag game.
Capture the Flag
Capture the Flag is a common children’s game where two teams battle it out attempting to capture the opponent’s flag. Many variations of this game have been played on playgrounds around the world, and is also often used as the basis of other games such as paintball, computer games, and even military exercises.
Most importantly, the security industry regularly makes use of capture the flag exercises. Participants normally have to use a wide array of techniques and expertise to do so. Techniques include port scanning, host enumeration, vulnerability exploitation, and more. Once the player has successfully “captured the flag” they have won the exercise.
Using the Capture the Flag game concept early on in an introductory course proved to be difficult, especially since not a lot of content had been covered up to this point. However, I decided that I could manipulate a basic port scan to be more than a simple means to discover hosts.
Planting the Port Flag
At this point during the module, I had only covered basic port scanning and enumeration techniques. As such, the exercise should not include any advanced security testing techniques. However, I did not want to create a “boring” assignment by only having students perform a basic nmap port scan and give us a report. By adding a some peculiar elements to the assignment, I could give the students a bit more excitement for this assignment.
I decided to turn a port scan assignment into a “capture the flag” game. As this was their first assignment of the type, I had to make a simple, easy to discover, flag. The exercise should also only make use of existing knowledge such as Network Basics and HTTP Basics. Not only would this reinforce prior knowledge, but will also demonstrate how this knowledge can be linked to new concepts. How the flag was hidden should also be related to port scanning.
The Flag
The flag planted was a faked balance sheet for a fictional company named ASCII Inc. and was hidden behind a password protected page. The flag must be obvious to the students, so they know that they had found it. I also made it obvious that the students were nearing the flag by spotlighting the secure area. The name of the company itself serves as a clue, as you will see later.
Concealing the Flag
The flag (the balance sheet) was hidden behind a Basic HTTP Authorisation page. Since this was a port scanning assignment, I was going to hide the password in the ports. The best way to do so would be to use ASCII numbers to represent characters of the password. Each port would then somehow represent a character in the password. Our chosen password was HAPPENCHANCE. Interestingly, each character in this password occurs exactly twice. This would help us later to reinforce that the port number represents something meaningful. The ASCII mapping for each letter is shown in the table below.
| Character | ASCII Value |
|---|---|
| A | 65 |
| C | 67 |
| E | 69 |
| H | 72 |
| N | 78 |
| P | 80 |
The flag itself was served on Port 443 for two reasons: firstly, 443 does not map to a normal ASCII character; and secondly, since 443 is normally reserved for HTTPS, it should signal that something secure is hidden here.
Once the flag was hidden, we now had to hide the password in the ports.
Setting Up the Hunting Grounds
You can download the configuration files I used for this exercise here.
I started by spinning up a virtual instance of Ubuntu Linux 18.04 LTS containing only the basic components to serve content to the Internet. A number of ports were then opened to serve content. The ports were 65, 67, 69, 72, 78, and 80 representing the ASCII characters. All the EVEN ports served HTTP content backed by nginx. The ODD ports served RAW content, backed by a custom python script. I also opened ports 83 and 443 using nginx.
The following table shows precisely what each port served:
| Port 72 | |
|---|---|
| Server Type | HTTP |
| Response HTTP Code | 200 |
| Response Body | Content-Length: 35 Content-Position |
| Additional HTTP Header | Content-Position: 1,8 |
After setting up all the above ports, I blocked Port 22, which is used to remotely connect (via SSH) to the server, to ensure that students do not confuse it as part of the exercise.
Finding the Flag
Now that the flag had been planted, it was up to the students to try and capture it. In this section, I describe the way in which I envisioned the students would have approached the exercise. This is by no means the only method the students could have used, but the one I found to be the simplest to explain.
The Exercise
Students were given this exercise directly after a lecture on portscanning as part of their assignments. The assignment document given to the students was as follows:
ASCII Inc. has been receiving reports that their financial information might have been leaked. The CIO suspects that the Finance Department uses non-standard security techniques to secure their confidential documentation. They have asked you to perform a penetration and security test on their network and the Finance Department computer system.
The CIO has requested that you provide a report on your results and process.
Instructions
- The only host you are allowed to target is [IP Address], you may NOT attempt to scan or enumerate any other host.
- Attempt to capture the Company Financial documents from the host.
- You may only use scanning techniques.
- You may NOT use any destructive techniques.
- Be creative. Think outside of the box.
- Write a report describing your process and results.
- Keep the details of your report confidential.
The possible points that can be accumulated for the exercise are shown below. All the criteria are self-explanatory and based on the the procedure (discussed in the following section). I made Bonus Points available if students did something ingenious or I did not expect.
| Criteria | Points |
|---|---|
| Captured the Flag | 30 |
| Identified Password | 10 |
| Identified Port to ASCII mapping | 20 |
| Identified all Services | 10 |
| Found all Ports | 5 |
| Performed Port Scan | 5 |
| Produced Detailed Report | 20 |
| Total | 100 |
| Bonus | (20) |
Students had a week to complete the exercise and could complete it from home or from the university campus.
The Procedure
Now that the students have been given the assignment they can start. Since this is a port scanning exercise, the first step would be to run nmap on the given host. The output from nmap would show which ports are open on the host as well as the potential services based on those ports. A sample output from nmap using the nmap -v -T5 -p 1-1024 [IP Address] is shown below.

| PORT | STATE | SERVICE |
|---|---|---|
| 65/tcp | open | tacacs-ds |
| 67/tcp | open | dhcps |
| 69/tcp | open | tftp |
| 72/tcp | open | netrjs-2 |
| 78/tcp | open | vettcp |
| 80/tcp | open | http |
| 83/tcp | open | mit-ml-dev |
| 443/tcp | open | https |
Looking at the open ports, the students might be overwhelmed by the number of “strange” ports that are open. However, they should notice that two more commonly known ports are open: Ports 80 and 443.
The student now has to attempt to reveal the service hosted on each particular port. Since the ports suggested by nmap are only the “common” services, it is up to the security tester to confirm the case.
Students are free to use whatever means they want to confirm the service, either by connecting to the port via a telnet-like session and obtaining the header or by eliciting further output from nmap. For simplicity of demonstration, I will demonstrate the HTTP services using a web browser and the RAW services using a console.
The first, most common, port is Port 80, which might reveal some additional information about the organisation or the use of the server. Once connected, a browser output should be similar to the output below. It should come as no surprise to them that the information is not readily available here. At this point, as well, I did not expect them to realise that information was hidden HTTP headers.

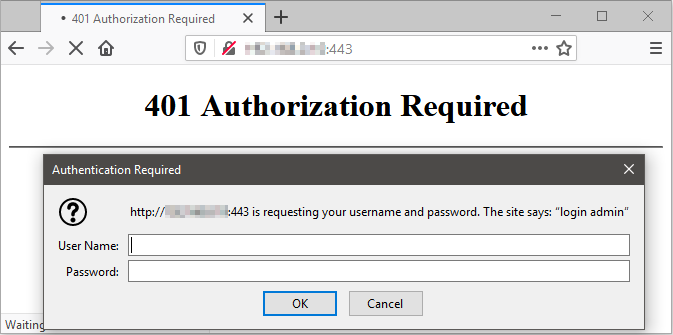
Next, the student might try to connect to 443 using HTTPS. However, since the service running on Port 443 is not truly HTTPS, their browser should give them an error. They can manually force their browser to connect to Port 443 using normal HTTP, upon which they will be met with a 401 Authorization Required dialog, as shown below. They do not yet have the password and so cannot continue.
Students can now cast their attention to the rest of the available ports. As none of the “standard” services running on those ports are known to the students, it was expected that they will now conduct some research on the services. This was a purposefully a red-herring to reinforce that services running on certain ports might not always be the “standard” service as expected on the particular port.
Failing to connect to the ports using conventional means, students can now start experimenting with these ports. The best way would be to attempt to capture a banner for each service in order to determine what is really running on that particular port. To do so, students can attempt to make a RAW connection to each port to determine the service and see if they can extract some information. The order in which students can connect is arbitrary, but the ideal order is as follows:
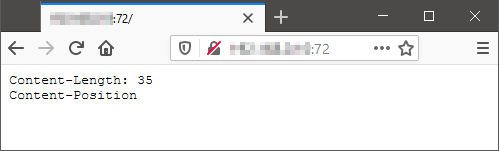
Connecting to Port 72, it should be obvious that it is running a normal HTTP service. When connecting to this port using a browser (or manually using HTTP commands), students are met with the output as shown below. In the response body Content-Length is shown along with another word Content-Position. Knowing that Content-Length is an HTTP header, this should lead the student to look at the HTTP Headers as was sent by the server. Content-Length then matches what was shown in the HTTP Body and Content-Position has the value of 1,8. Students can now start connecting to the other HTTP services.
Connecting to Port 78 using a browser (or manually again), will only show the response body of N, as shown below. Looking at the HTTP headers, Content-Position has the value of “6,10”. The N in the Response Body maps the ASCII value of 78 (the port). However, if the student did not pick up on this clue yet, it should become clear later.

Port 80, as shown earlier is a basic landing page, but in the HTTP header “Content-Position” has the value of “3,4”.
The next ports are not HTTP services, but RAW services and should ideally be connected using a TELNET client.
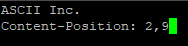
When connecting to Port 65, the service will only return “Content-Position: 2,9” and then disconnect. The same with Port 69 that will return “Content-Position: 5,12” and disconnect as shown below.
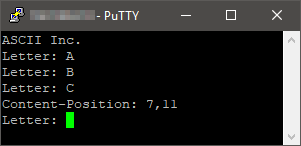
However, connecting to Port 67 the service will output “ASCII Inc.” followed by “Letter:”. The service will not disconnect and wait for input. If the student figured out the ASCII clue from earlier, they should find out which character 67 maps to in ASCII. However, the service will also allow them to attempt multiple times. Once the student enters the correct letter, “C”, the service will output “Content-Position: 7,11” as shown here.
Once the student has deduced that the port numbers map to ASCII and that each of the services running on the ports output “Content-Position”, they should start putting the clues together. Mapping all the port numbers to the ASCII equivalent character, and placing them in the correct position, the word “HAPPENCHANCE” should be revealed:
| Content-Position | 1 | 2 | 3 | 4 | 5 | 6 | 7 | 8 | 9 | 10 | 11 | 12 |
|---|---|---|---|---|---|---|---|---|---|---|---|---|
| Port/ASCII Value | 72 | 65 | 80 | 80 | 69 | 78 | 67 | 72 | 65 | 78 | 67 | 69 |
| Character | H | A | P | P | E | N | C | H | A | N | C | E |
The Red Herring
The keen observer might have noticed that there was one last port, Port 83, open that is not used. This port was opened as a red herring and there were several clues left to indicate that it should not form part of the password.
First, the HTTP response code was 403 Forbidden as opposed to 200 OK as with the rest of the HTTP clues.
Secondly, even though the body contains the number “13”, which could be a position, there was no direct reference to “Content-Position”.
Finally, in the password “HAPPENCHANCE” each letter appears twice, the letter S that corresponds to the ASCII value of 83 would only have appeared once.
Capturing the Financials
Now that the students have put together the password, it is time to use it. Previously they should have discovered that the HTTP service running on Port 443 was a password-protected area. They should now navigate to that page and will be presented by the login as shown below. The login popup shows “login admin”. Though it was slightly obscure, the student should have assumed that the User Name for the authorized area should be “admin”. The Password that they deduced is “HAPPENCHANCE”, although lowercase “happenchance” was also accepted.
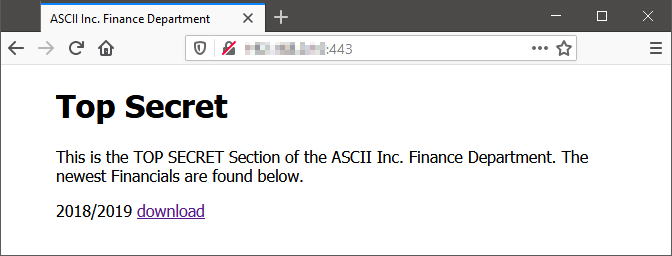
Once entering the restricted area, the student will be met with the screen below from where they can download the Balance Sheet! Congratulations.
After the week given to the students to complete this exercise, I explained the scenario to them and the procedure we envisioned them to follow. In the following section I will share some observations regarding this exercise.
Observations
When the exercise above was given, 18 students were registered for the module. Of those, 15 students completed the exercise with 9 students finding the solution completely or partially.
Overall, informal feedback found that the students were quite excited about this first exercise in that they were able to use “professional” tools. They found the lack of guidance to be difficult at first but did discover the excitement when figuring out a peculiar puzzle. Common feedback was the solution was “very straight forward once you know what to look for”. Regardless of their outcome, the majority of students described the experience as “fun” and “interesting”.
There were a couple of mistakes and different routes that I did not expect:
Not All Ports
The most common reason for not completing the exercise was that the students did not run a thorough port scan. They scanned the host using only the default nmap ports, which are the most common 1000 ports. As such their scans did not detect the lesser-used ports (65, 67, 69, 72, and 78).
Thinking Too Far Ahead
Another common mistake that we found was that students attempted and got stuck on other enumeration and vulnerability exploitation techniques. The most common of these was the use of “SQL Injection” for the 401 Authorization Required prompt. As we had not covered SQL Injection at this point, students were going in blind and attempting to follow tutorials they found online. They also did not realise that eliciting output using SQL Injection during a 401 Authorization Required prompt is nearly impossible.
Conspiracy Theories
One student informed us that they thought the exercise was “too straightforward” and that there “must be more than meets the eye”. As such, the student in question attempted to find the (non-existent) deeper meaning in all of the clues. This caused the student to spend too much time on a wild goose chase, while the tame geese were just sitting and waiting.
Web Look-ups
Although we do not necessarily find this to be a mistake, we do note that some students got carried away with trying to find additional information surrounding the host on which the exercise was hosted. As we had only given them an IP address to scan, they, for example, reported back on who the owner of the IP address was and whether the IP address had appeared on the blacklists. While this information could be very useful during a normal security test, it did not contribute to the assignment. Students were awarded for this additional effort, however.
ISP Blocks
I had a single student who could not complete the exercise because their personal Internet Service Provider had blocked users from accessing non-standards ports. Since most students completed the exercise from home, I questioned the group of students and discovered that it was this single ISP who prevented scanning and connecting to non-standard ports.
Conclusion
I showed how I made a basic port scanning exercise more exciting without requiring too much new knowledge. In the exercise, students were able to use prior knowledge of computer science and the newly introduced information gathering techniques. They were then reliant on the deductive reasoning skills to complete the task. I showed that students will take part in and enjoy a task that allows them to use industry-level tools and skills as quickly as possible.
I also showed that students will intuitively start using their reasoning skills if they are not provided with too much information, allowing them to approach the problem in an unconventional manner. Not only does this improve their reasoning skills, but allows students to think independently and creatively. Based on the participation and feedback, we deemed this exercise to be a success and will begin moulding future exercises using the same premise.
As indicated in education theory, experiential learning can reinforce the theory taught in classes and should be applied as quickly and systematically as possible. In the future, in order to allow students to get hands-on experience in the shortest practical time, we will be making use of more simple exercises that rely on prior knowledge and deduction skills. Future studies will include examining the role deduction plays in improving the use of tools as well as the understanding of security testing as a whole.
Addendum
The supporting files for this exercise is available for download here.
This post was orignally presented and published at the 2020 IFIP World Conference on Information Security Education. The preprint article is downloadable here.